Air Tightness & Air Pressure Testing in accordance with the Passivhaus Standard

Passivhaus primer: Airtightness Guide Airtightness and air pressure testing in accordance with the Passivhaus standard
A guide for the design team and contractor


Why?
Undesirable air leakage increases the space heating demand of a building, as well as causing occupant discomfort from cold draughts.
Air leakage can also lead to long term problems in the building fabric, where it is repeatedly damaged by the transmittance of water vapour – resulting in interstitial condensation.
Very low air leakage rates are required by the Passivhaus Standard and must be demonstrated for each certified building by means of a “blower door” Air Tightness Test. The air change rate must be less than or equal to 0.6 air changes per hour, under test conditions.
Passivhaus airtightness standard = (n50) ≤ 0.6 h-1 @ 50 Pa – This is equivalent to having a hole less than the size of a 5p piece for every 5m2 of envelope!
How?
The key principle for achieving airtightness is to create a single, continuous, and robust airtight layer (or air barrier). This layer surrounds the thermal envelope of the building.
It is essential that the construction team is fully briefed on the airtightness requirements of Passivhaus and receives clear, well laid out details in good time. It is advised that a clear communications plan and project delivery programme should be developed.
Effective project management is essential to ensure a high standard of construction. It is critical for site management to have some training on airtightness and for the site trades personnel to receive ‘toolbox talk’ training sessions prior to installing the airtight barrier.
It is recommended that at least 2 air pressure tests, ideally 3 tests are carried out during the construction phase. All tests should be comparable in terms of results i.e., the (Vn50) volume used should be the same for all tests and is effectively the final volume of the finished building.
- Stage 1: Once the initial air barrier sealing works are completed. (required)
- Stage 2: Once the secondary fix works are complete.
- Stage 3: At completion (required)
Building Preparation
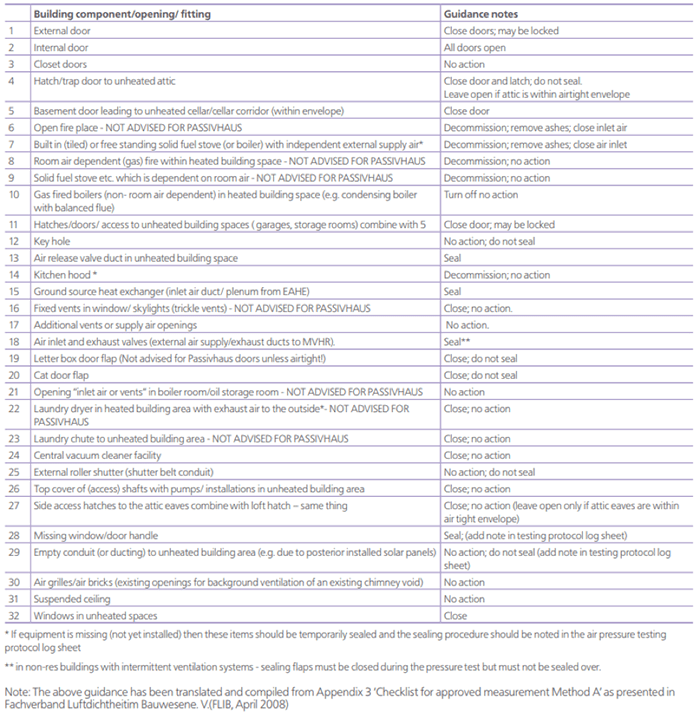
- In preparation for the pressure test the building’s ventilation system must be closed and sealed. In residential buildings this will involve sealing the MVHR inlet and extract ducts from the external air. The inlet and exhaust ducts should be sealed at their external ends to avoid testing the MVHR unit or internal ductwork.
- All water traps must be filled, or if no water is present in the building - these traps must be temporarily sealed.
- Other openings in the external envelope like doors, windows and loft hatches must be closed for the duration of the test and must not be temporarily sealed.
- All sealed openings must be noted and recorded in the test report.
- Internal doors must be wedged open for the duration of the airtightness test to ensure an even distribution of air pressure throughout the building.

Passivhaus primer: Airtightness Guide Airtightness and air pressure testing in accordance with the Passivhaus standard
A guide for the design team and contractor


Share
